Configuring the 3CX Session Border Controller
Introduction
3CX includes the 3CX Session Border Controller (SBC) which allows easier bridging of remote 3CX instances and connection of remote extensions. The 3CX SBC combines all SIP (signaling) and RTP (media) VoIP Packets from one location and delivers them to and from another location (typically the PBX Server) using a custom TCP protocol. This simple concept allows 3CX to overcome firewall or telecom provider issues. The 3CX SBC can be used for the following reasons:
- Resolve issues of NAT Traversal at both the remote and the PBX
- Simplified Firewall configuration at both the remote and the PBX location.
- Overcome difficulties with ISPs that block VoIP Traffic based on port
- Allows VoIP-over-WiFi in some restricted locations, such as Hotel
- “Fixes” Firewalls that cannot handle VoIP traffic correctly or which are very problematic to configure correctly, such as Microsoft ISA Server
Note: Status information does not get carried through the SBC to the remote network as of yet. Make sure that the HTTPS ports you have chosen during the installation are open on the PBX server side.
How it Works

The 3CX SBC
The image above demonstrates how the 3CX SBC works. In this example, 3CX Phone System is on IP Address 10.0.0.181, and listens on TCP port 5090 (by default) for incoming Tunnel traffic. We must set up a single Port Forwarding rule on the NAT/Firewall Device, telling it that all incoming TCP and UDP traffic received on port 5090 should be delivered to LAN IP Address 10.0.0.181.
The remote setup is shown on the left hand side of the cloud. In this example, the machine with IP address of 192.168.0.2 has the 3CX app installed. We will need to tell the VoIP Phone the public IP address of the PBX Server (which in this case is 213.165.190.51), and also the private IP address of the PBX Server (which in this case is 10.0.0.181). Since the 3CX app will by default use the standard port numbers used by 3CX, typically no further configuration is necessary.
The 3CX SBC can be used in the following scenarios:
- Connect Remote Sites using the SBC – For remote sites with a number of remote phones, you can deploy the 3CX SBC to the site so that all phones will communicate with the 3CX PBX over a single port. This is also the preferred option in case 3CX is running in the cloud.
- Connect Remote 3CX app Users – The 3CX apps for Windows, Mac, iOS and Android have a built in tunnel that will be used automatically when the 3CX app detects it is not on the LAN.
- Connect 3CX instances via a Bridge – When creating a Bridge to another 3CX Phone System, you can choose to use the 3CX SBC rather than a direct connection.
Configuring the SBC
We will use the above example in “How the 3CX SBC Works” to configure a tunnel connection.
Step 1 – Configure the Firewall
The tunnel protocol is designed to eliminate NAT traversal problems and reduce firewall configuration work to a minimum. There is only one Firewall setting that needs to be made – we must forward the TCP and UDP tunnel port (set by default to 5090) to the PBX.
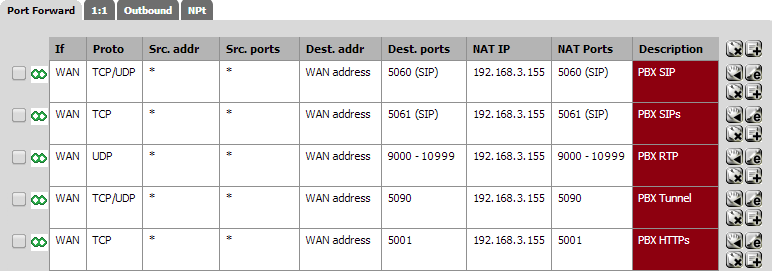
Configuring a Port Forward Rule in pfSense
The above picture shows configuration for a pfSense firewall – most firewalls will provide similar functionality. In your firewall:
- Enable Port Forwarding.
- Specify the PBX’s Local IP Address (which we had set previously to 168.9.213)
- Set the Type to “TCP/UDP”.
- Set the Port Range to be from 5090 to 5090 (only one port).
- Set the Comment field to “3CX SBC”.
- Click on the “Add” button followed by the “Apply” button. Your firewall configuration is now done!
Step 2 – Configuring Remote Sites via 3CX SBC, 3CX Apps, Bridges
After you have configured the local tunnel connection and the firewall, the tunnel is now “ready for use”. You must add an SBC connection and install an SBC with a static LAN IP at the remote site, in order to configure the 3CX apps or the Bridges accordingly.
Add and Manage SBC Connections
Add new and manage connections to remote SBC(s) in 3CX “Management Console” > “SIP Trunks”, before installing at the remote site:
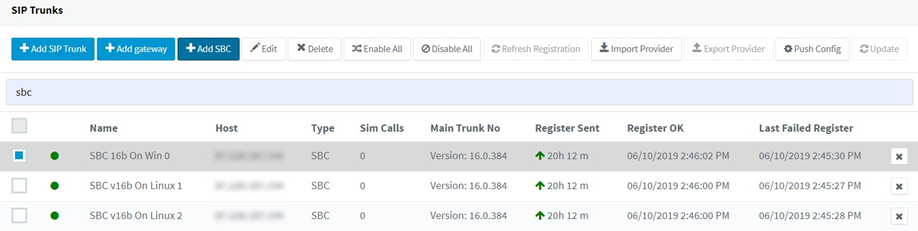
- “Add SBC” – click to create a new SBC
- Provide the SBC name without special characters, e.g. Luxembourg
- In the SBC configuration page copy the “Authentication KEY ID” and note the “Web Url” for your PBX, to configure the SBC during installation.
- Click “OK” to close the configuration page and proceed to install the SBC. To re-configure and update the SBC(s) installed at remote sites, select and:
- “Push Config” – send the updated settings to the SBC(s) to re-configure.
- “Update” – remotely update outdated SBC(s) to the latest stable
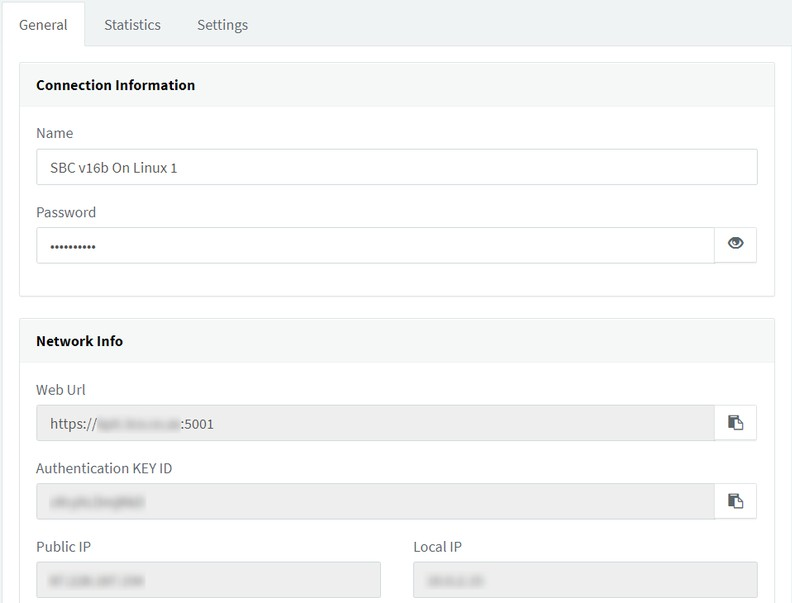
Edit SBC Connection Settings
-
- “General” tab:
-
- “Connection Information” – set the SBC connection name and verify the tunnel
- “Network Info” – shows information such as Web UrI, authentication key ID, Public IP, Local IP
-
- “Statistics” tab – review and monitor system and network statistics for the SBC
- “General” tab:
“Settings” tab:
○ “Options”
-
-
- “Security” – set the SBC connection security level – defaults to TLS (Transport Layer Security).
- “First Audio (RTP) Port Number” – set the starting port number to use for audio calls on the SBC
- “Enable Failover” – if you have failover configured, enable and set the “Public IP Address Of Secondary 3CX Server” for the SBC to connect to when the primary 3CX server is unresponsive.
-
○ “Logging and Troubleshooting”:
-
-
- “Logging Level” – set the log level for the SBC device, i.e. Low, Medium, Verbose. Logs are kept for:
- Linux in: /var/log/3cxsbc/3cxsbc.log
- Windows in: C:\ProgramData\3CXSBC\Logs
- “Log File Size” – set the maximum log file size to keep and rotate to a log backup when it is
- “Logging Level” – set the log level for the SBC device, i.e. Low, Medium, Verbose. Logs are kept for:
-
📄 Note: After troubleshooting in “Verbose”, remember to switch back to Low or Medium to conserve CPU and disk resources.
Install 3CX SBC (Session Border Controller)
The 3CX SBC is suitable for sites with multiple IP phones in the same LAN. After configuring the SBC connection in 3CX “Management Console”
-
- “SIP Trunks”, follow the SBC Installation Guide to install the SBC at the remote site for Debian, Raspbian and Windows
Leave A Comment?