Installing the 3CX Live Chat and Talk Plugin for WordPress
Introduction
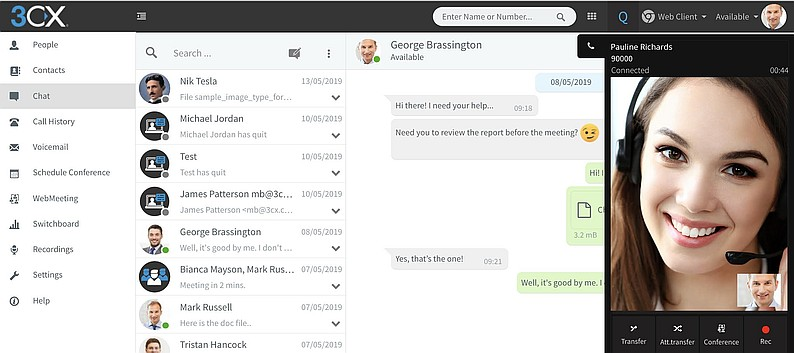
The “3CX Live Chat and Talk” plugin enables your WordPress site visitors to talk and chat directly with you via the latest 3CX PBX. Calls from website visitors are forwarded to your PBX using WebRTC (Web Real-Time Communication) technology, free of any charges.
Install and Configure Plugin
To install the “3CX Live Chat and Talk” plugin on your WordPress site:
- Login to WordPress and go to “Plugins” > “Add New”.
- Search for “3CX Live Chat and Talk” and click on “Install Now”.
- When the installation completes, click on “Activate” to enable the plugin on your WordPress
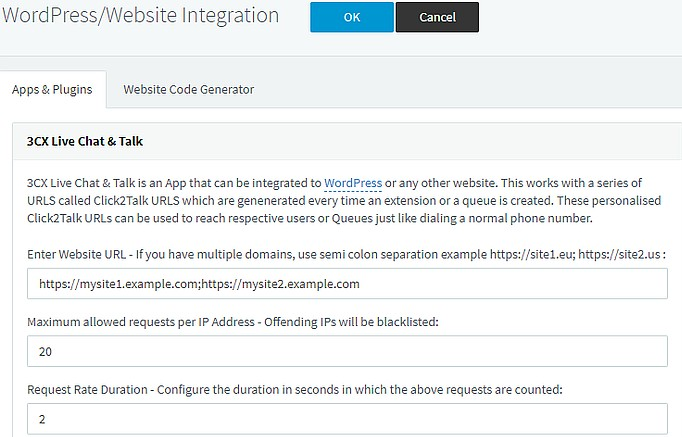
- Switch to the 3CX “Management Console” > “Settings” > “WordPress/Website Integration” > “Apps & Plugins” section and specify
💡 Tip: You can specify multiple website URLs separated by semicolon, e.g.
https://my-site-0.example.com;https://my-site-1.example.com.
- Access security is implemented via the “Maximum allowed requests per IP Address per period” field, limiting the number of incoming un- replied chats sent to the 3CX extension in the defined “Request throttle period length, seconds” period.
- Click on “OK” to save your settings in the 3CX Management
Create a “Live Chat & Talk” Item
After installing and configuring the “3CX Live Chat and Talk” plugin on your WordPress site, you need to start creating “Live Chat & Talk” items. These can be used in specific pages or posts or even site-wide to enable you to chat, call and video call with your WordPress site’s visitors. To create a “Live Chat & Talk” item:
- In your WordPress site administration panel, click on the “3CX Live Chat & Talk” sidebar link and then on “Add New” to create a new “Live Chat & Talk” item.
- Set the name for the new “Live Chat & Talk”
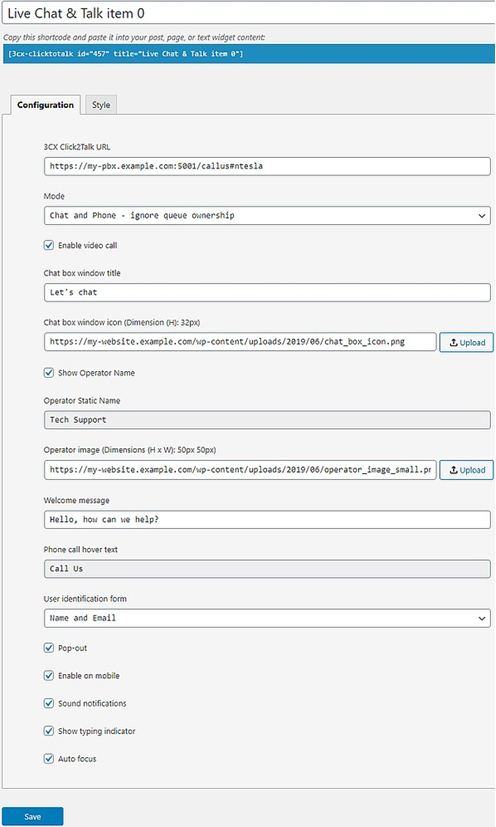
- Use the “Configuration” tab to set these options:
- “3CX Click2Talk URL” – use the “Click2Talk URL” from the “Click2Talk/Click2Meet” tab for the extension or queue in the 3CX Management Console, assigned to handle the incoming chat messages, g. https://my-pbx.3cx.eu/callus#sales.
- “Mode” – enable phone call, chat, phone call and chat, and optionally ignore queue ownership for phone and video
- “Enable video call” – website visitors can alternatively initiate a video call instead of an audio
- “Chat box window title” – the panel title for the chat
- “Chat box window icon” – set the chat box window icon by uploading an image (height 32px) or using a
- “Show Operator Name” – enable to display the name of the PBX extension / queue / agent as the message sender. Requires v16 Update 5.
- “Operator Static Name” – text to display to visitors as the message sender, if “Show Operator Name” is
- “Operator image” – leave empty for the default operator icon, or set by uploading an image (50 x 50 px) or using a
- “Welcome message” – the welcome chat message automatically displayed to website visitors using the
- “Phone call hover text” – the hint text appearing when hovering over the phone icon, when “Phone only” mode is
- “User identification form” – choose to ask visitors for their Name and/or Email before a chat or call
- “Sound notifications” – enable sound notifications for the
- “Show typing indicator” – enable to notify the visitor when an agent is typing a message. Requires v16 Update
- “Auto focus” – automatically focus keyboard input to the chat box when visitors open your web
- On the “Style” tab, use these fields to customize the plugin’s appearance on your WordPress site:
- “Primary color” – set the HTML color code for the chat box title background, Minimised/Phone-only mode background, Authentication button and Text input
- “Secondary color” – set the HTML color code for the chat box title text and Minimised/Phone-only mode
- “Panel width” – set the chat box panel’s horizontal size, in pixels. Defaults to
- “Panel height” – set the chat box panel’s vertical size, in pixels. Defaults to
- “Position” – set the chat box location to “Bottom Right” or “Bottom Left”.
- “Animation style” – set the animation style to “Slide up”, “Slide left”, “Fade in” or
- “Minimized style” – set the minimized style for the chat box to “Bubble” or “Tab”.
- “Load minimized” – enable to display the chat box panel minimized. Enabled by default for visitors on mobile browsers and when “Pop-out” is enabled.
- “Facebook Account URL” – set your Facebook account URL, linked in the chat
- “Twitter Account URL” – set your Twitter account URL, linked in the chat
- “Email Address” – set your email address, linked in the chat
- “Show “Powered By 3CX”” – enable to display this text in the chat
- Click “Save” when done
Display Plugin Panel on WordPress Site
You can display the “3CX Live Chat and Talk” panel, by copying a specific shortcode from the list of “Live Chat & Talk” items and enable it on:
- All site pages:
- Go to “Appearance” > “Widgets” and drag a “Text” widget in a site widget area visible across the site, e.g. the footer area of the active WordPress
- Add the shortcode, e. [3cx-clicktotalk id=”15” title=”Click To Talk to Us”], in the content and click “Save” to apply.
- A specific post or page:
- Create a new Post or Page.
- Add the shortcode, e. [3cx-clicktotalk id=”15” title=”Click To Talk to Us”], in the content and click “Publish” to apply.
- Click “Preview Changes” to see the post or page with the embedded “3CX Live Chat and Talk” plugin
Offline Mode
When your associated 3CX extension or queue agents are unavailable or logged out, an offline form is automatically presented to web visitors. Info submitted through the offline form is delivered via chat message to the associated extension or queue agents.
Leave A Comment?