Introduction
3CX provides integration with Salesforce via the 3CX API for CRM. The configuration is done server-side, in an easy and straightforward way. This integration provides these benefits to users of 3CX and Salesforce:
- Contact Synchronization – Inbound calls from external numbers trigger a contact lookup in your CRM, and contact details are added to 3CX Contacts. This way, the caller name is automatically shown in your phone display when you receive the call.
- Call Pop-ups – When using the 3CX Web Client, the customer record is brought up to you automatically when you receive an inbound call.
- Call Journals – Calls are logged as call records in the CRM.
- Chat Journals – Chats are logged as task records in the CRM.
- Create a new contact automatically when a call is received from an unknown number.
- Click to Call – Launch calls straight from Salesforce via 3CX, using the 3CX Desktop App for Windows.
This guide takes you through the steps required to set up your Salesforce CRM with 3CX.
Salesforce Configuration
General
- Login to your Salesforce account https://login.salesforce.com/ or create a developer account from here https://developer.salesforce.com/signup.
Notes:
- Your Salesforce account must have REST API Enabled. Check here the Salesforce editions in which the API is available.
- Salesforce accounts with Person Accounts enabled are not supported.

- Click on “Gear icon” > “Setup.”
- On the sidebar, under the section PLATFORM TOOLS, select “Apps > App Manager.”
- Click “New Connected App” button on the top right of the webpage.

- Enter an App name, example CXPBX, a contact email and press save.
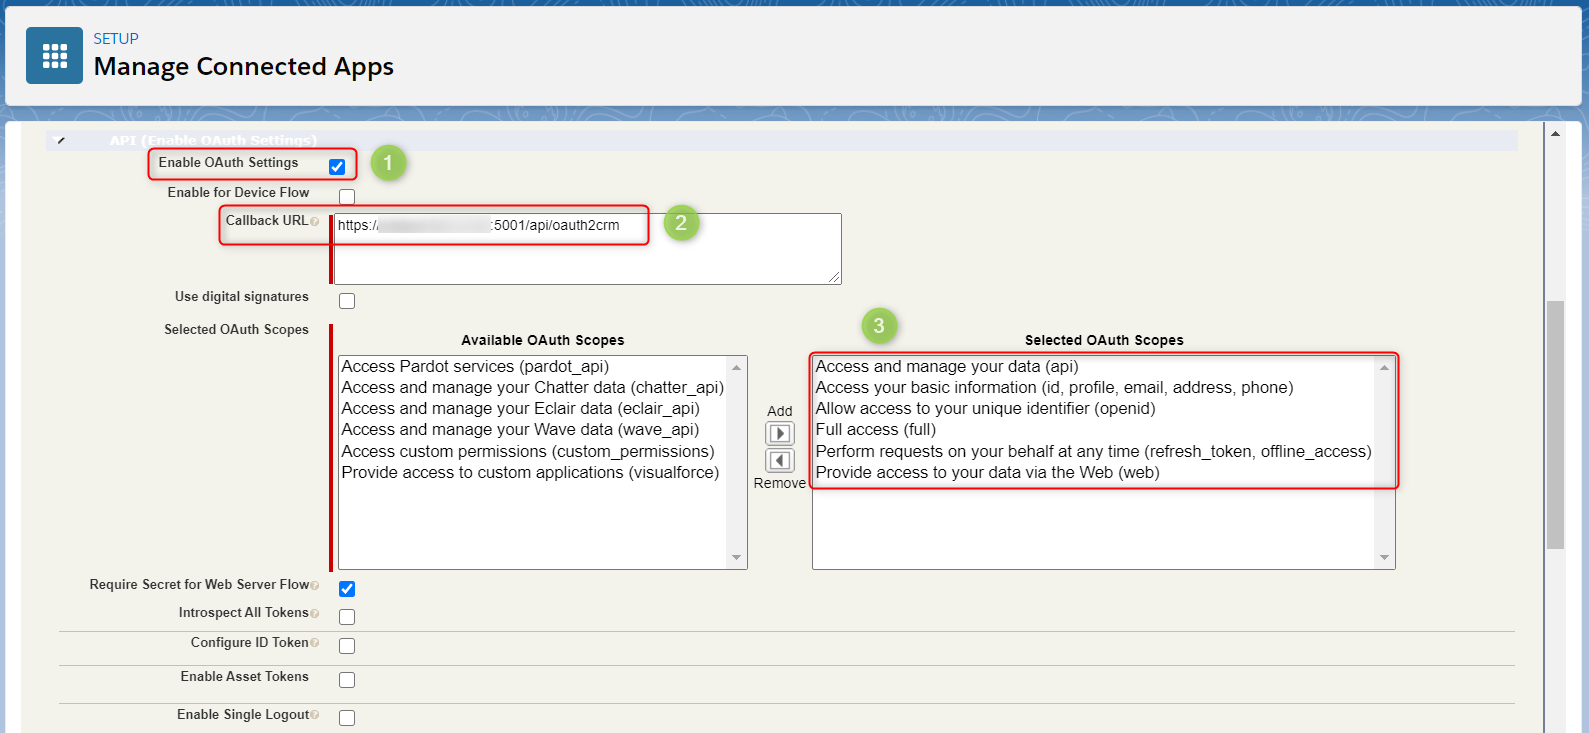
- Scroll down to API (Enable OAuth Settings) and enable the checkbox “Enable OAuth Settings”.
- For the Callback URL field, enter the URL you use to access your 3CX management console, adding “/api/oauth2crm” at the end, e.g.: “https://my-pbx.example.com:5001/api/oauth2crm”. Then give permissions as per image above. The permissions are:
- Access and manage your data (api).
- Access your basic information.
- Access to your unique identifier (openid).
- Full Access.
- Perform requests on your behalf at any time.
- Provide access to your data via the Web.
- Press Save.

- Click “Apps > App manager > Find your app” from the list and click “View”.
")
- In the API section Copy “Consumer key” and “Consumer secret” – we will need to add these later inside the 3CX CRM Server side integration section.
- Click on “Manage” at the top and “Edit Policies.”

- Go to the OAuth policies section and set Permitted users to “All users may self-authorize”. Press Save.
Call & Chat Journaling
- If you want to report external calls or chats to Salesforce, you need to populate the dedicated Extension field on the User entity with the agent extension number. This way 3CX can map the extension number of the agent that received the call or chat to the Salesforce User.
- Click on “Gear icon” > “Setup”

- On the sidebar, under the section ADMINISTRATION, select “Users > Users”
- Open the Users for whom you need to report calls or chats and press Edit.

- Populate the Extension field with the extension number and press Save.

3CX CRM Server Side Configuration
Contact Matching Strategy
To get a match with Salesforce, the incoming Caller ID must be identical to the CRM entry, including any prefix, as Salesforce performs whole number lookups. Querying Salesforce using a subset of the digits, does not return any data. The recommended practice is that you store the numbers in Salesforce using E164 format, including the plus (+) prefix, and your SIP Trunk provides the caller’s number in E164 format as well, so both match. If this is not the case, you can use Caller ID Reformatting to adjust the caller’s number before being passed on to the CRM.

⚠ Important: In 3CX Management Console, open “Advanced” > “Contacts” > “Options”, set the matching strategy to “Match exactly” and click “OK” to save.
⚠ Important: In Salesforce ensure that all your contacts’ numbers are stored in E164 format, including the plus (+) prefix. This plus (+) prefix prevents Salesforce from automatically reformatting the number if you’re located in the USA or Canada, causing that the contact lookup fails.
General Settings
- Login to the 3CX Management Console and go to “Settings” > “CRM Integration” > “Server Side” tab.
- Select “SalesforceV2” from the dropdown list.

- Fill in the details you got in the previous step for Consumer Key, and Consumer Secret, and press the Authorize button to start the authorization process. Grant access to 3CX, and the Refresh Token will be shown under the Authorize button.
Call Journaling
- If you want to report external calls to the CRM, check the Enable Call Journaling checkbox and configure the parameters below.
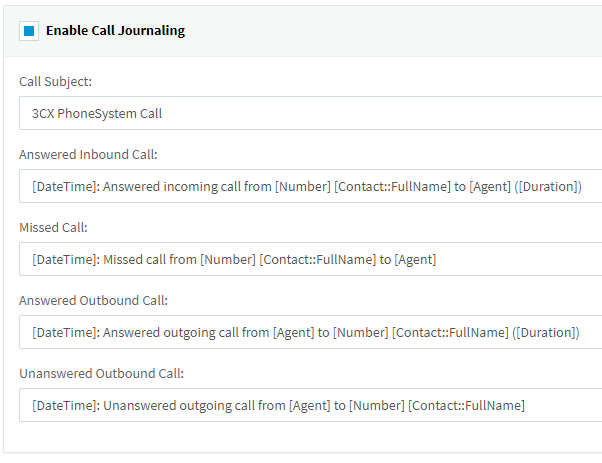
- Call Journaling parameters are:
- Call Subject: The subject of the call.
- Answered Inbound Call: Description for answered inbound calls.
- Missed Call: Description for missed calls.
- Answered Outbound Call: Description for answered outbound calls.
- Unanswered Outbound Call: Description for unanswered outbound calls.
- Please note that you can use variables in the Call Journaling parameters. Variables are specified between [], for example the external number is specified as [Number]. The available variables are:
-
CallType
– The type of call, it can be “Inbound”, “Outbound”, “Missed”, or “Unanswered”.
-
Number
– The external contact number (the number dialed for outbound calls or the caller number for inbound calls).
-
CallDirection
– The direction of the call, either “Inbound” or “Outbound”.
-
Name
– The name of the matched contact.
-
EntityId
– The ID of the matched entity (contact, lead or account).
-
EntityType
– The type of the matched entity (“Contact”, “Lead” or “Account”).
-
Agent
– The extension number of the agent handling the call.
-
AgentFirstName
– The first name of the agent handling the call.
-
AgentLastName
– The last name of the agent handling the call.
-
AgentEmail
– The email of the agent handling the call.
-
Duration
– The duration of the call in “hh:mm:ss” format.
-
DurationTimeSpan
– The duration of the call as a TimeSpan object, which can be formatted as the user wants.
-
DateTime
– The start date & time of the call, in the local time zone, formatted using the local culture from the 3CX server.
-
CallStartTimeLocal
– The start date & time of the call, in the local time zone, as a DateTime object, which can be formatted as the user wants.
-
CallStartTimeUTC
– The start date & time of the call, in UTC time zone, as a DateTime object, which can be formatted as the user wants.
-
CallEstablishedTimeLocal
– The date & time in which the call was established, in the local time zone, as a DateTime object, which can be formatted as the user wants.
-
CallEstablishedTimeUTC
– The date & time in which the call was established, in UTC time zone, as a DateTime object, which can be formatted as the user wants.
-
CallEndTimeLocal
– The end date & time of the call, in the local time zone, as a DateTime object, which can be formatted as the user wants.
-
CallEndTimeUTC
– The end date & time of the call, in UTC time zone, as a DateTime object, which can be formatted as the user wants.
📄 Note: This feature is only available for 3CX versions 16 and later.
Chat Journaling
- If you want to report chats to the CRM, check the Enable Chat Journaling checkbox and configure the parameters below.

- Chat Journaling parameters are:
- Chat Subject: The subject of the chat session.
- Please note that you can use variables in the Chat Journaling parameters. Variables are specified between [], for example the external number is specified as [Number]. The available variables are:
-
Number
– The external contact number (only available when this is a chat through SMS).
-
Email
– The external contact email address (only available when this is a chat through Live Chat).
-
Name
– The name of the matched contact.
-
EntityId
– The ID of the matched entity (contact, lead or account).
-
EntityType
– The type of the matched entity (“Contact”, “Lead” or “Account”).
-
Agent
– The extension number of the agent handling the chat.
-
AgentFirstName
– The first name of the agent handling the chat.
-
AgentLastName
– The last name of the agent handling the chat.
-
AgentEmail
– The email of the agent handling the chat.
-
Duration
– The duration of the chat in “hh:mm:ss” format.
-
DurationTimeSpan
– The duration of the chat as a TimeSpan object, which can be formatted as the user wants.
-
DateTime
– The start date & time of the chat, in the local time zone, formatted using the local culture from the 3CX server.
-
ChatStartTimeLocal
– The start date & time of the chat, in the local time zone, as a DateTime object, which can be formatted as the user wants.
-
ChatStartTimeUTC
– The start date & time of the chat, in UTC time zone, as a DateTime object, which can be formatted as the user wants.
-
ChatEndTimeLocal
– The end date & time of the chat, in the local time zone, as a DateTime object, which can be formatted as the user wants.
-
ChatEndTimeUTC
– The end date & time of the chat, in UTC time zone, as a DateTime object, which can be formatted as the user wants.
📄 Note: This feature is only available for 3CX versions 18 and later.
Contact Creation
- If you want to create new contacts in the CRM when a call is received from an unknown number (not found in both 3CX and CRM), check the Enable Contact Creation checkbox and configure the parameters below.

- Contact Creation parameters are:
- Create Contacts on Call Direction – Select if you want 3CX to create contacts on Inbound calls only, or also on Outbound calls.
- Create Lead or Contact – The entity to be created (Lead/Contact).
- New Contact First Name – The first name of the newly created Contact.
- New Contact Last Name – The last name of the newly created Contact.
- New Lead Company- The name of the Company when a Lead is created.
- Please note that you can use variables in the parameters. Variables are specified between [], for example the external number is specified as [Number]. The available variables are:
-
Number
– The external contact number (the number dialed for outbound calls or the caller number for inbound calls).
-
CallDirection
– The direction of the call, either “Inbound” or “Outbound”.
📄 Note: This feature is only available for 3CX versions 16 and later. Since 3CX v16 Update 7, you can configure if you want that only inbound calls trigger the creation of new contacts, or also outbound calls.
Reference:
https://www.3cx.com/docs/salesforce-crm-integration/
Leave A Comment?